Connecting to Cloud Providers
AARNET Cloudstor
NOTE
Cloudstor service has been decommissioned since Dec 2023. For old accounts, please check access with the provider.
All VUW researchers have access to the AARNET (Australia’s Academic and Research Network) Cloudstor service which provides 1 TB of space to each researcher. To use this service first login and download an appropriate client to your laptop or desktop (or smarthone if you wish):
NOTE: Within the Cloudstor web login settings you will need to create a Cloudstor Password, this is the password you will use to login on Rāpoi, it does not use your VUW credentials for the command line login.
We suggest setting up an App Password for Raapoi-rcopy rather than a global sync password. This way if your password is compromised you can easily just remove that app password. Setup an App Password by clicky on the settings gear on the top right and finding the App Password link.
Once you have setup your cloudstor (aka ownCloud) credentials you can use them to sync data to and from Rāpoi. For example, if I wanted to sync my project space to Cloudstor I would do the following from Rāpoi login node:
# Use Tmux to keep your session alive if you disconnect. You can reconnect to your Tmux session if you reconnect. See Tmux docs.
tmux

# Use our new module system
module use /home/software/tools/eb_modulefiles/all/Core
module load rclone/1.54.1

#check if cloudstor remote is already configured
rclone listremotes
The above sequence starts a tmux session to allow the transfer to continue even if I disconnect from the cluster
(type tmux attach to reconnect) and then loads the rcopy module - which requires the use of our new module system.
If you don't already have CloudStor configured as a remote (which you won't if this is your first time using it) follow the instructions on aarnet docs page.
Once we have setup rclone to connect to CloudStor, we copy our data. In this case from<my scratch folder>/test to test on CloudStor
Amazon AWS
Create a python environment and install awscli module.
Before you proceed you will need to configure your environment with your Access Key ID and Secret Access Key, both of which will be sent to you once your account is created or linked. The command to configure your environment is aws configure You only need to do this once, unless of course you use more than one user/Access Key. Most users can simply click through the region and profile questions (using the default of "none"). If you do have a specific region this should be relayed along with your access and secret keys.
Once you have the appropriate environment in place and your configuration setup you can use the aws command, plus an appropriate sub-command (s3, emr, rds, dynamodb, etc) and supporting arguments.
More information on the CLI can be found here: http://docs.aws.amazon.com/cli/latest/userguide/cli-chap-using.html
Transferring Data to/from Amazon (AWS) S3
To transfer data from S3 you first need to setup your AWS connect, instructions for that can be found above. Once that is done you should be able to use the aws commands to copy data to and from your S3 storage.
For example if I wanted to copy data from my S3 storage to my project directory I could do the following:
  tmux
  module load amazon/aws/cli
  cd /nfs/scratch/<username>/project
  aws s3 cp s3://mybucket/mydata.dat mydata.dat
To copy something to storage simply reverse the file paths, eg.
The above starts a tmux session to allow the transfer to continue even if I
disconnect from the cluster (type tmux attach to reconnect). I then load the
modules necessary to use the AWS commands. I change directory to my project
space and use the aws s3 cp command to copy from S3. More information on using
aws can be found here:
http://docs.aws.amazon.com/cli/latest/reference/s3/index.html#cli-aws-s3
Working with AWS Data Analysis Tools
Amazon has a number of data analytics and database services available. Using the command line utilities available in Rāpoi, researchers can perform work on the eo cluster and transfer data to AWS to perform further analysis with tools such as MapReduce (aka Hadoop), RedShift or Quicksight.
A listing of available services and documentation can be found at the following: https://aws.amazon.com/products/analytics/
Google Cloud (gcloud) Connections
The Google Cloud SDK is available in Rāpoi. This includes a command-line interface for connecting to gloud services. To get started, first load the environment module. You can find the path with the module spider command. As of this writing the current version can be loaded thusly:
This will give you access to the gcloud command. To setup a connection to your gcloud account use the init sub-command, eg.
Follow the instructions to authorize your gcloud account. Once on the Google website, you will be given an authorization code which you will copy/paste back into the Rāpoi terminal window.
Transferring Data to/from Google Cloud (gcloud)
To transfer data from gcloud storage you first need to setup your gcloud credentials, instructions for that can be found above. Once that is done you should be able to use the gsutil command to copy data to and from your gcloud storage.
For example, if I wanted to copy data from gcloud to my project directory I could do the following:
  tmux
  module load gcloud/481.0.0
  cd /nfs/scratch/<username>/project
  gsutil cp gs://mybucket/mydata.dat mydata.dat
The above starts a tmux session to allow the transfer to continue even if I
disconnect from the cluster (type tmux attach to reconnect). I then load the
modules necessary to use the gsutil commands. I change directory to my project
space and use the gsutil cp command to copy from gcloud. More information on
using gcloud can be found here:
https://cloud.google.com/sdk/gcloud/
Working with GCloud Data Analysis Tools
Google Cloud has a number of data analytics and database services available. Using the gcloud command line utilities available on Rāpoi, researchers can perform work on the cluster and transfer data to gcloud to perform further analysis with tools such as Dataproc (Hadoop/Spark), BigQuery or Datalab (Visualization)
A listing of available services and documentation can be found at the following: https://cloud.google.com/products/
DropBox Cloud Storage
Upload/Download Limits with DropBox
Dropbox has upload/download limitations and we have found that once your file gets above 50GB in size the transfer will have a better chance of timing out and failing.
Configuring your Dropbox account on Rāpoi
Step A: On your local laptop or desktop start your browser and login to your Dropbox account
Step B: On Rāpoi type the following:
Step C: Setup account credentials (You should only need to do this once):
Run the following command from Rāpoi
You will now see something like the following:
- Go to https://www.dropbox.com/1/oauth2/authorize?client_id=X123...
- Click "Allow" (you might have to log in first).
- Copy the authorization code. Enter the authorization code here:
Step D:
Copy the URL link listed in Step C1 and paste it into the web browser that you started in Step A
This will provide you with a long access code (aka hash). Now copy that access code and paste it into your Rāpoi terminal after Step C3 where it is asking for Enter the authorization code here
Now hit enter or return. You should see that you are now logged in with your Dropbox credentials
Basic Dropbox commands
Remember to load the dropbox environment module if you have not already (see module spider for the path)
Now type dbx or dbxcli at a prompt. You will see a number of sub-commands, for instance ls, which will list the contents of your Dropbox, eg
Downloading from Dropbox
Downloading uses the subcommand called: get. The basic format for get is:
For instance, if I have a datafile called 2018-financials.csv on Dropbox that I want to copy to my project folder I would type:
Uploading to Dropbox
Uploading is similar to downloading except now we use the subcommand: put. The basic format for put is:
For example I want to upload a PDF I generated from one of my jobs called final-report.pdf I would type:
This will upload the PDF and name it the same thing, if I wanted to change the name on Dropbox I could:
Microsoft OneDrive
RClone can be used to connect to onedrive, google drive, etc. The steps below implement onedrive setup on Rāpoi.
Follow the on-screen instructions, e.g., make a new remote - enter "n"; to select storage type; "onedrive" and keep following default options until "Use auto config" and enter "y" here.
This should display a url; copy and paste in the browser and it should get set up.
To view your files on the remote onedrive, you can use:
# For example, rclone lsd <remote>:<dir_name>, in my case, I would do:
rclone lsd my_staff_onedrive:Documents
GLOBUS
External sharing coming soon!
Presently, users can share/transfer data to and from locations including cluster, research storage, and personal devices. Options for enabling data sharing externally are being explored.
First time users should be able to sign up on GLOBUS website using their university credentials by following this link: https://app.globus.org/.

Please install and start GLOBUS connect personal. Please find those instructions here: https://globus.org/globus-connect-personal
You should now be able to share or transfer your data by following their guide: https://docs.globus.org/guides/tutorials/manage-files/share-files/.
Transfer files using Globus
Globus works by seting up endpoints which are like locations for data transfer. This means, we will need two endpoints to transfer data; one - a source, and the other - a destination.
The steps below will walk you through the Installation and then navigating the Globus File Manager.
The installation process is same for both the globusconnectpersonal setup and for any of the Rāpoi's compute nodes.
Installation
Working on a Windows machine?
The steps below are for a non-windows based operating system. For Windows OS, please see https://globus.org/globus-connect-personal
globusconnectpersonal setup
Inside the termial of your device, please run the following command:
wget https://downloads.globus.org/globus-connect-personal/\
linux/stable/globusconnectpersonal-latest.tgz
tar xzf globusconnectpersonal-latest.tgz
# this will produce a versioned globusconnectpersonal directory
# replace `x.y.z` in the line below with the version number you see
cd globusconnectpersonal-x.y.z
Here, we'll be presented with a url. If it is our first time, it will ask for creating an account, if you haven't done it before. Once, the account is set up, you'll be presented with an authorization code to enter into the code prompt. An example of this process is shown below:
$ ./globusconnect -setup --no-gui

We will display a login URL. Copy it into any browser and log in to get a
single-use code. Return to this command with the code to continue setup.

Login here:
-----
https://auth.globus.org/v2/oauth2/authorize...
-----
Enter the auth code: 0ZaZ....

== starting endpoint setup


Input a value for the Endpoint Name: <enter_relevant_name>
registered new endpoint, id: 56d4c388....
setup completed successfully

Will now start globusconnectpersonal in GUI mode
Graphical environment not detected

To launch Globus Connect Personal in CLI mode, use
  globusconnectpersonal -start

Or, if you want to force the use of the GUI, use
  globusconnectpersonal -gui
Finally, run globusconnect
On the personal device it will display a window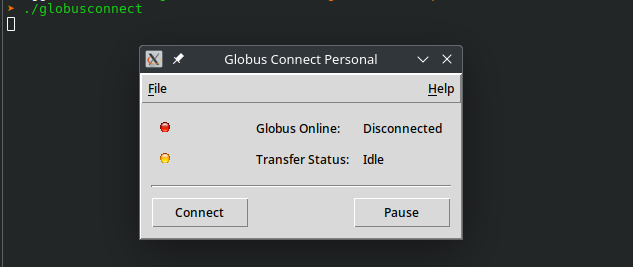
This completes our setup on the personal device. Now, we should be able to set it up on Rāpoi.
On Rāpoi
Launch an interactive session
Tip
Request more time for the interactive session, if you are wanting to transfer huge amount of data.
srun --time=0-05:00:00 --pty bash
Once you are on a compute node, please follow the steps starting from globusconnectpersonal setup as above
Changing default directory to put your data?
echo "/new/path/address/,0,1" > /nfs/home/$USER/.globusonline/lta/config-paths
Here, the /new/path/address will be the path of your choice, e.g., /nfs/scratch/$USER/
This should now makes our two endpoints of data transfer accessible from the Globus website.
Globus File Manager
Leave the above running, and login to Globus website.
Open the File Manager Tab from the login page.
You should now be able to browse the names of your personal device and Rāpoi's compute node to transfer your files. An example shown below:
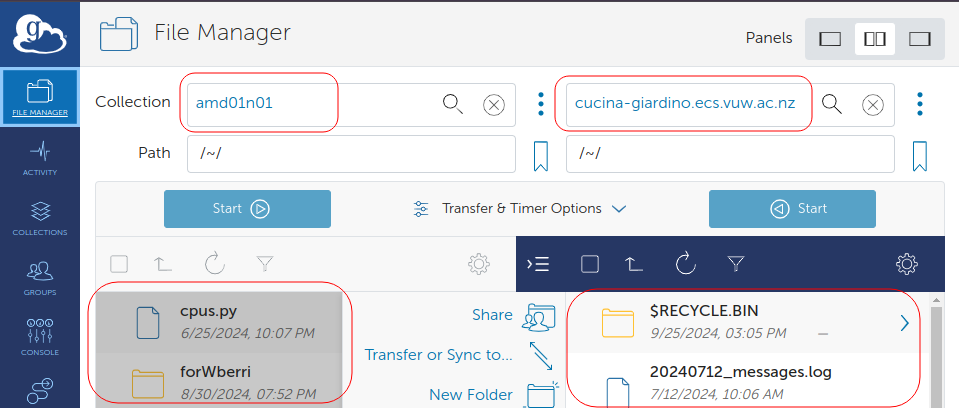
You are now ready to transfer your data.